

Arushi Nath
Grade 5
Co-founder HotPopRobot.com
My Idea: The Dragonfly Bot


In 2020, I participated in my first overnight hackathon: the Elle Hacks at the York University. The hackathon was for 3 days and we had to come up with a challenging project.
I was deciding what project to make when I came across the website of Backyard Brains. (http://backyardbrains.com/) Backyard Brains talked about how a dragonfly is the best hunter in nature. That surprised me because I expected it to be a lion or a shark. Who would expect that a small insect can be so good at hunting its prey? I read on and found out that the dragonfly had only 16 visual neurons. The small number of neurons ensures that information can travel fast making the dragonfly very quick.

Figure 1
When the dragonfly sees a creature in front of it, it first estimates its size to make sure it is not a predator. It than silently follows it and waits for the right time to capture it. Finally, it sends signals to its wings to fly which helps it get its prey. Using this strategy, it has more than a 97% chance of caching its prey while lion have only 25% chance and sharks 50%.
https://www.ted.com/talks/greg_gage_how_a_dragonfly_s_brain_is_designed_to_kill?
I decided that a Dragonfly Bot was the project I would make during the Elle Hacks. I wanted to create a robotic dragonfly that could see from which side the prey was coming and then fly towards it.

Figure 2
Making of Dragonfly
As for all my projects I started with a pencil and paper. I did it to see what components I would need and to break the project in to several parts.
Hardware used:
An Arduino: Arduino is a programmable microcontroller to which all the components are connected.
Two Light Dependent Resistors (LDR): LDR serves as eyes of the dragonfly. They measure the incoming light to see if the light is getting blocked. If it gets blocked it means, there is an obstacle in front of the eyes.
Two 50 Kilo ohms resistors: Resistors control the voltage going to the LDRs.
Two mini servos: To act as the wings of the dragonfly.
One Breadboard: To neatly make all the connections.
Wires: To connect all the components to the Arduino.
A soft drink can: To act as the body of the dragonfly.
Software used:
Arduino interface: To program the sensors and servos.
Steps to Making the Dragonfly
There were 7 steps to be followed to make the dragonfly. I first started with putting together all the hardware. It was followed by the software programming part.
Step 1: An LDR has 2 ends. I attached one end of the left LDR to the positive (5V) of Arduino. The second end of the left LDR was divided into 2 parts. The first part was attached to a resistor which was then connected to the ground (GND) pin of Arduino and the second part was attached to an Analog (A0) pin of Arduino. The same thing was done to the right LDR and the second resister except that this time the LDR was connected to Analog pin A1 instead of A0.
Step 2: I attached the 2 servos to the Arduino. The negative ends of the servos were connected to the ground of the Arduino (GND). The positive ends of the 2 servos were connected to the positive (5V) of Arduino. The signal pin of the Left servo was attached to digital pin 6 and the signal pin of the Right servo was attached to digital pin 5.
Step 3: I attached all the components to a breadboard to make it neater and easier. I then attached everything I had connected to a soft drink can, which would act as the body of the dragonfly. See Figure 3.
Step 4: My dragonfly’s hardware was complete integrated with sensors and servo. I could start programming it!

Figure 3
Step 5: I first got the readings from the 2 LDR’s using a very simple ‘Analog Read Serial’ command of the Arduino programming language. If there was light on the LDR the resistance would decrease, and if the light was blocked then the resistance would increase. That way if the resistance value is big, then there is an object in front of the dragonfly. If the value is small, then there is no object in front of the dragonfly.
Step 6: I used “If and Else” statements in the Arduino language. They were used to see on which of the LDR the light was getting blocked. How did that happen? It looked at the values the two sensors were getting. The dragonfly compared the values to see which one was bigger. If the left LDR had a bigger value that there was an object on the left side. Similarly, if the right LDR had a bigger value the object was on the right. If there was an object on the left side, I used a servo library to activate the right servo. Similarly, if there was an object on the right side the left servo would move.
Why would that make sense? If there is an object on the left side the Dragonfly Bot would want to turn to the left to follow the insect. To turn left, the right wing had to move because it would push the air towards the right allowing the dragonfly to move left. The logic is the same if it wants to move right.
Step 7: My dragonfly was ready for testing! I plugged the Arduino in to the computer and it worked like I wanted it to. When I blocked the right light sensor the left wing moved and when I blocked the left light sensor the right wing moved. I was happy with the results. I made a couple of Slides of my project and my Dragonfly was ready to be demoed for the Elle hacks.
In the Elle Hacks competition participant would get the chance to demo their projects to at least 3 judges each for 5 minutes. Then the judges would give all the participants marks based on how good their project is and how nicely they explain it. I learned that explaining you project simply gives you half the marks! At the end of the presentation everyone would show their demo and the judges would ask questions.
So, in my case I explained about what I wanted my dragon fly to do, how I did it and gave a demo of it working. My demos were successful. I got a lot of questions. Some of the questions they asked were on the programming language I used, how I got the idea, and what was the most challenging part of my project. As I made everything from the beginning, it was easy for me to answer all the questions.
It was also a good opportunity to see projects made by other people and learn from them.
Improving my Dragonfly Bot: Adding Logic Gates to Dragonfly Bot
When I came home, I was happy with the project that I completed on my own in only 48 hours (2 days). But I wanted to do more. I wanted to improve my dragonfly. For next few weeks I read more about the dragonfly. I learned that it had almost 360-degree eyesight which helped it look for its prey. Out of the 16 visual neurons, there were 8 neurons on each eye. So, depending on which side neurons got activated, it would be able to better target the position of the prey and fly to it at the best angle. I wanted my dragonfly to have neurons too.
I read about big swarms of locusts eating crops in many countries in Asia and Africa like Kenya, Sudan, and India. If during Covid19 lockdown the crops were damaged, then some kids could go hungry. I wanted to help those kids and farmers and try to stop the locusts. Then I thought ‘Why not make my dragonfly search for locust instead of any prey’. I then decided to improve my dragonfly robot so that it became closer to the real dragonfly .
I would use logic gates to replicate the neurons. I decided on using the NAND logic gate as NAND is a universal gate. It means that using only NAND gates, I can replicate all 6 other logic gates, the AND gate, the OR gate, the XOR gate, the NOR gate, the XNOR gate and the NOT gate.
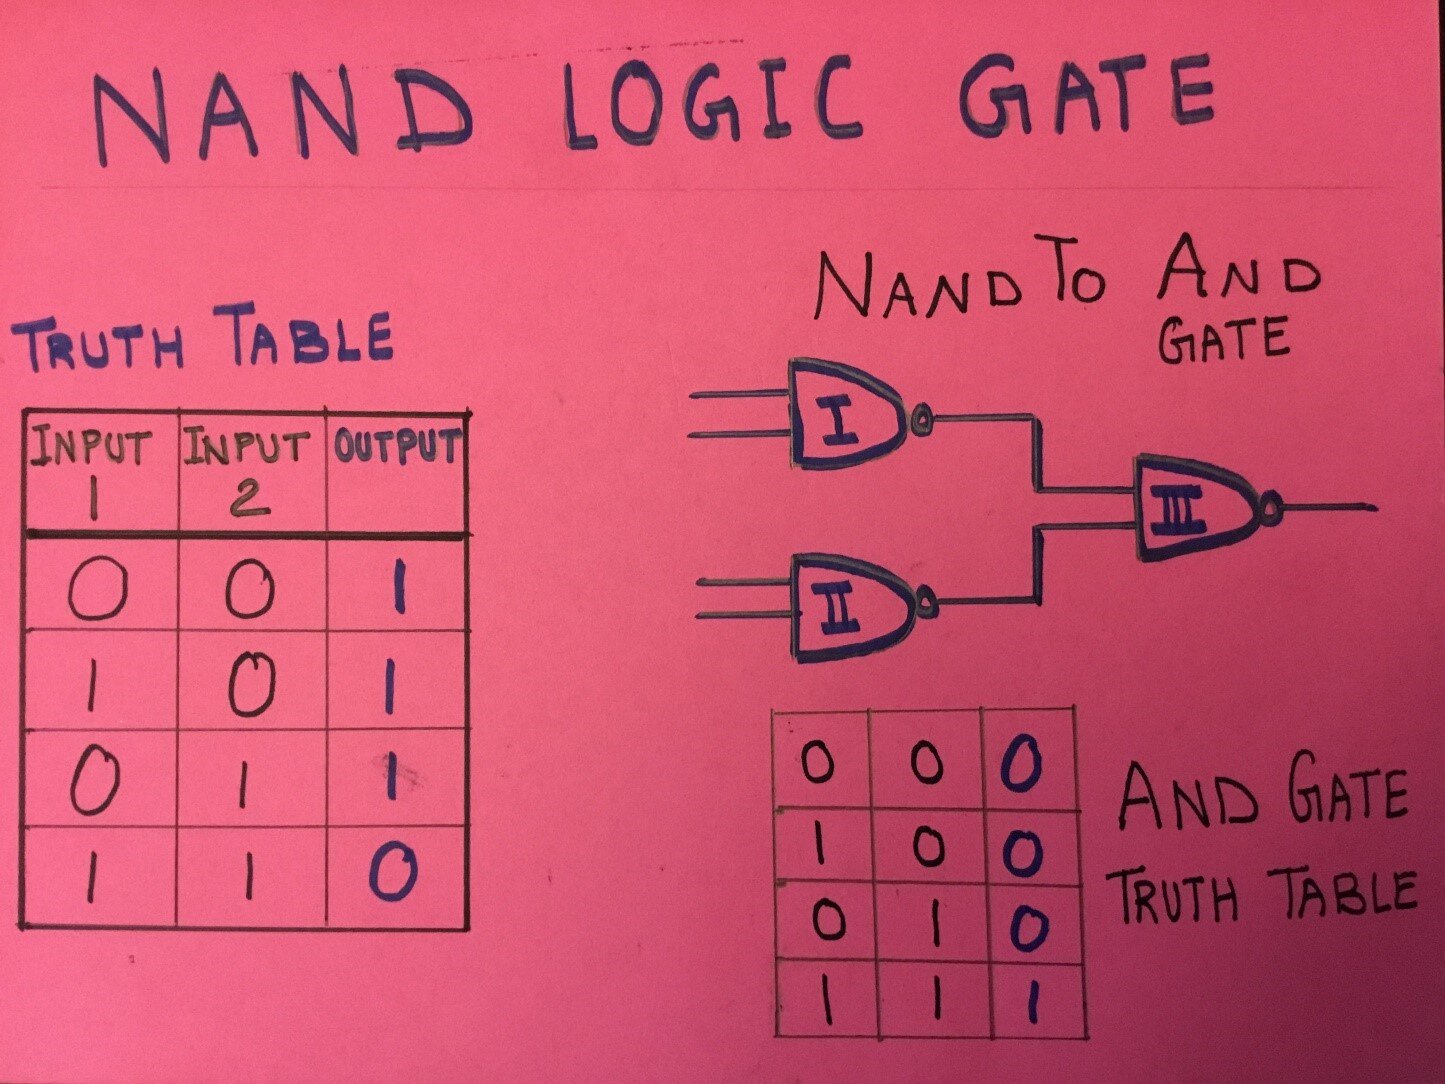
Figure 4
How did I do it?
I decided to name my improved dragonfly bot as DroNeS (Drone + Neurons + Sensors).
The DroNeS would silently stay on the ground waiting for a locust to come. If it detects a locust it would wait for it to come near enough. When it came close to DroNeS, it would start flapping its wings and fly with the locusts to take its pictures, observations, and location coordinates.
It meant I would need to create an AND gate so the DroNeS got activated when both the conditions are met: the light is blocked by the locust and its distance is close enough for it to fly to it.
Additional Material Needed:
Three NAND gates
Ultrasonic distance sensor

Figure 5
Steps to Creating the DroNeS
Step 1: I connected the 2 sensors to the Arduino
Step 2: I needed to build an AND gate using NAND gates. So, I used 3 NAND gates. The outputs of the first 2 NAND gates will be the inputs of the third NAND gate.

Figure 6
Step 3: I connected the output of the Nand gate to the Arduino
Step 4: I connected the two servos to the Arduino
Step 5: I attached all the components to a plastic water bottle.
Step 6: My model was ready! Now it was time to program it.

Figure 7
I first programed the sensors to give their readings using an ‘analog read command’. Then I converted their readings in to 0’s and 1’s using if and else commands. I did that because the NAND gates can only take 0 and 1 as inputs. I then programed the Arduino to read the output of the NAND gate. If the input were a 1, the servos would move using the servo library of Arduino. If the input were a 0, then the servos would not move.
Step 7: My model was ready to test. When I put a paper locust in front of the light sensor at some distance, it detected it. But nothing happened as the locust was far and both the conditions were not true. When I moved the locust moved closer the ultrasonic distance sensor detected it. Both the conditions were now met, and the wings started flapping.
My DroNeS model was successful! I wanted to display my project at the Toronto Science Fair 2020. I could not display it as the fair was cancelled.
Future of Dragonfly Bot
In the future I would like to attach solar panels to my DroNeS so that it can travel longer distances in a more environmentally friendly way.
I would also like to build swarms of DroNeS so that they can move the locusts away from the crops using ultrasonic sound.
Thank you, Backyard Brains, for the idea, thank you Elle Hacks for inspiring me to build things, and thank you Arduino for making it easy to build new things.
ABOUT THE AUTHOR

Arushi Nath
I love participating in hackathons. I have participated in over 30 hackathons and won many of them. Some of the hackathons I participated in are the NASA SpaceApps Challenge, Hardware Hackathon, Hacking Health and Elle Hacks. I won the NASA SpaceApps Challenge Toronto in 2014, 2018 and 2019. In 2020 I became the NASA SpaceApps COVID19 Challenge Global Winner from over 1400 teams from 150 countries for my project that converted the impacts of COVID19 lockdown into a musical. As an award winner I have been invited by NASA to witness a spacecraft launch when travel is deemed safe. I was the national winner of the Canadian SpaceApps Challenge 2017 for my project on creating art pieces from satellite imagery. I was invited to present my project at the Canadian Space Agency in Montreal and meet the new astronauts!